What Do You Beef to Have to Replace the Head Gasket on a Accord 02
Hardlymoving writes about the practice-information technology-yourself maintenance and repair of Asian cars.

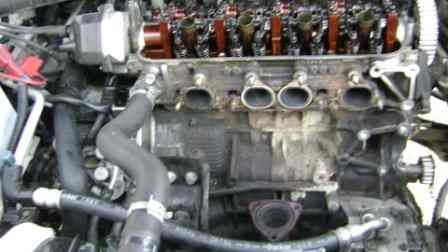
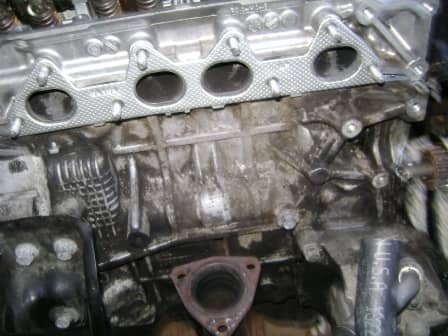
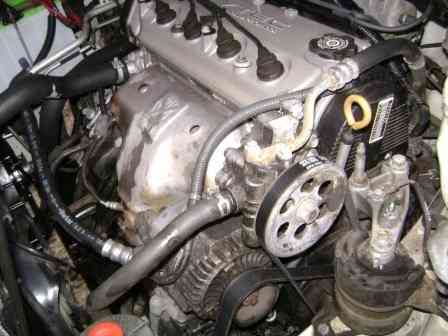
Honda Accord F23 with removed cylinder head, ready for a new head gasket.
How I Knew My Caput Gasket Had Failed
After I warmed upwards the engine, I constitute my Accord's exhaust pipe was billowing out white fume, and the coolant was bubbling in the coolant reservoir tank. I added coolant to my radiator and started the car with the radiator cap removed. Then coolant immediately shot out of the radiator filler neck—a clear indication of head gasket failure. Later I found a fissure in the radiator. My cooling organization had overheated to the point of head gasket failure.
Did this or something similar happen to yous, too? Read on to learn more.
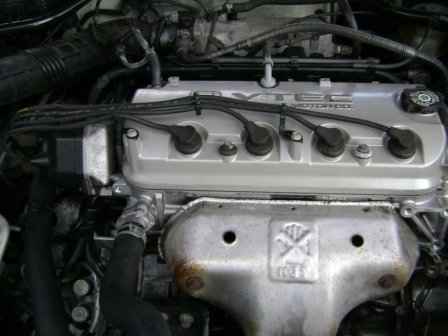
The Honda F23 two.3L I4 Engine
The repair pictured beneath was washed on a Honda F23 2.3L I4 engine—the engine too used in the '98-'99 Acura CL, '98 Odyssey, and '98-'99 Oasis.
Before Y'all Decide to Replace the Head Gasket
Before yous determine to replace the head gasket, consider the following:
- Replacing a head gasket is time-consuming. And so afterward you lot remove the cylinder caput, you should determine whether the engine cake mating surface is warped by more than .002 of an inch. If it is, a new gasket installation may not fix the trouble. Consider performing a complete engine bandy or block replacement instead.
- The pistons must exist checked for cracks. If at that place are cracks, consider an engine swap or block replacement.
- In one case the cylinder head has been removed, have an automotive machine shop check it out for cracks, good valve seal, and warping of the mating surface and the cake deck. Fortunately, the caput I removed was but slightly warped. The machinist milled (shaved) the head by .001 to make the mating surface flat.
- If you decide to invest the time and effort involved in replacing the cylinder head, consider besides replacing the water pump, thermostat, timing belt, intake and exhaust manifold gaskets, timing belt tensioner pulleys, valve cover gasket, spark plug seals, and accessory belts. Practice it now and salve the time and expense of having to do so in the futurity.
- Allocate around xvi hours of your time to complete the task, perhaps even more than. That includes time spent working on the car as well equally time spent cleaning your parts, obtaining special tools and replacement parts, and dropping off and picking up the cylinder head from the motorcar shop. But proceed in mind that doing it yourself instead of bringing the entire task to a repair store may yield ameliorate quality results. Some repair shops will practise anything to get the job finished as soon equally possible.
- Have you ever replaced a timing belt and the water pump on an overhead-cam car? On these cars, a head gasket replacement effort is a timing belt task, except three or four times more hard.
I will presume that you have a complete metric tool set with sockets that fit 1/4", iii/viii" and 1/ii" socket wrenches with extensions, box- and open-end wrenches, screwdrivers, and then along. Whatsoever you don't take you'll have to buy at your local tool supplier or online.
Just to give you a major heads up, you will also demand:
- a ½" xiv mm metric spline socket for the head bolts,
- (perhaps) a torque angle gauge,
- a iii/eight" bulldoze torque wrench
- an electric or air-powered impact commuter
- 2 ½" breaker bars
- at to the lowest degree one hydraulic jack
- a good penetrating oil
- silicon spray for the rubber components
Parts to Buy
- New Torque-to-Yield (TTY) head bolts like this one
- Multi-layered steel (MLS) head gasket or a kit like this ane
- Valve cover gasket
- Valve embrace/spark plug seals
- Intake manifold gasket
- Frazzle manifold gasket
- Exhaust-manifold-to-exhaust-pipe gasket
- Thermostat
- New hoses, based on condition
- Various other coolant-related gaskets, based on status
- Silicone-based gasket sealant and maker
- Timing chugalug or a timing belt kit like this one
- Timing belt tensioner bearing
- Residue shaft chugalug
- Balance shaft tensioner bearing
I also highly recommend that you obtain a technical repair manual—from Haynes, Bentley, or the manufacturer—to cross-reference with what I've done. When information technology came fourth dimension to torque down the nuts and bolts for the cylinder caput and the intake and exhaust manifolds, I referred back to the technical transmission for torque specs, as well as the torque sequence.
The photos below are a combination of before and afterward disassembly and re-assembly steps. If I missed a photograph during disassembly, I would apply a photo during the assembly process to explain a disassembly step. It's difficult at times to stop any y'all are doing to have a photo.
Before You Starting time
Set bated an area in your garage to place removed parts in the social club they were removed. This includes the basics and bolts. Although this volition add time to your work effort, the re-assembly of your parts will go much more than chop-chop. Eliminate the guesswork of what nut or bolt goes with what part. Don't mix them up in a coffee can!
Also, consider taking "before" and "after" photos. A picture goes a long style when trying to figure out what goes where during the re-associates process.
Gyre to Continue
Read More from AxleAddict
1. Gear up the Job
Heighten the driver's side wheel and back up the car with a jack stand. Disconnect the positive battery last, and drain the coolant at both the engine block and radiator. Dedicate an surface area where you tin can set downwards removed parts in the order in which you remove them.
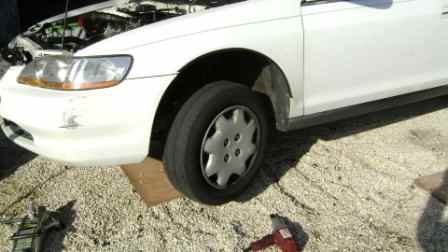
Raising the driver's-side bicycle in grooming for removing information technology.
ii. Remove the Crankshaft Pulley Commodities
Remove the wheel to expose the crankshaft caster. Remove the pulley bolt with either an bear on driver or a pulley property tool—I recommend the pulley holder tool listed here.

Pulley holder tool for Hondas
Breaker bar with caster holder attached
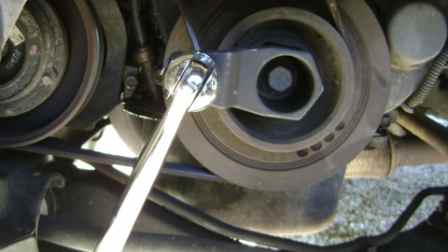
3. Prepare to Remove the Pulley Bolt
Insert the caster holder tool to the crankshaft pulley and attach a long ½" bulldoze billow bar (like the ane beneath) to the holder. Then, rotate the crankshaft pulley with another ½" socket wrench with an attached ½" extension and socket until the breaker bar is secured against the ground from moving. Since the crankshaft bolt may be torqued up to 180 lbs, utilise a jack stand to support the ½" drive extension for another billow bar when applying force to remove the crankshaft commodities. I found my jack stand wasn't loftier plenty, and then I added a wooden block to gain the extra height.

Supporting the 1/2" extension to the breaker bar
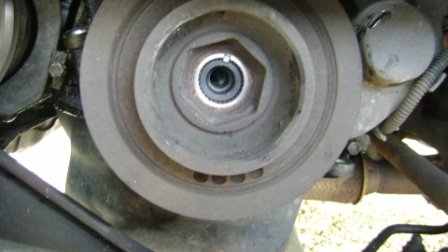
Afterward removing the pulley bolt
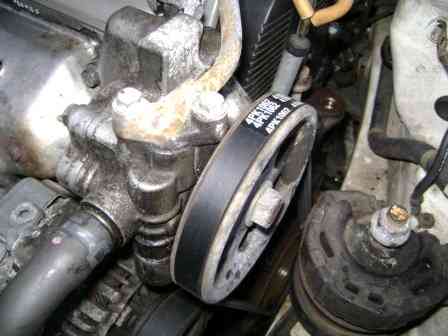
four. Remove the Belts
Loosen the belt tension on both the ability steering pump and alternator, then remove the belts.
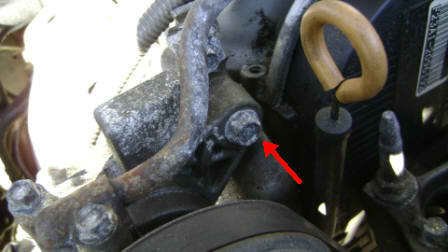
On the power steering pump, there are two bolts—one on the top right and the other on the bottom left. After loosening them, button downwardly on the pump to salve the tension.
Loosen the top bolt that the alternator rotates on, followed by the nut on the lesser of the alternator bracket bolt. When loosened, rotate the adjustment bolt (which turns into the bracket commodities) counter-clockwise, and push downwardly on the alternator to save the belt tension.
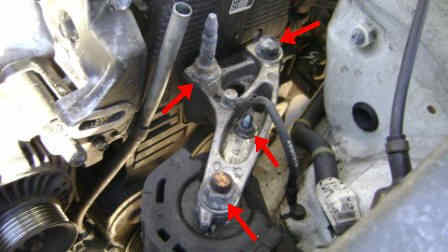
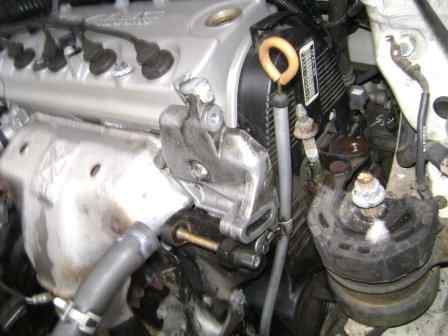
5. Remove the Side Engine Mountain
Support the engine from canting with a hydraulic jack when the side engine mountain is removed. To prevent damage to the oil pan, place a apartment piece of wood between the oil pan and the hydraulic jack.
Remove the ground strap followed by the 2 nuts and 1 commodities. In addition, you need to loosen the nut that's in the middle of the bracket, since there'due south a small rotating metal subclass underneath that must be turned before pulling off the mount.
6. Remove the Spark Plug Wires, the Valve Comprehend Bolts, and the Valve Embrace

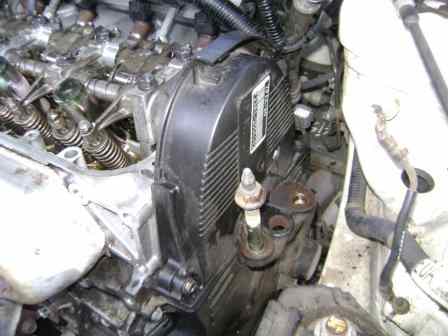
vii. Remove the Upper Timing Belt Embrace
Now, there are but two bolts that demand to exist removed. Detach the alternator wires recessed within the comprehend, then pull up and out to remove the cover. Remove the oil dipstick equally well.
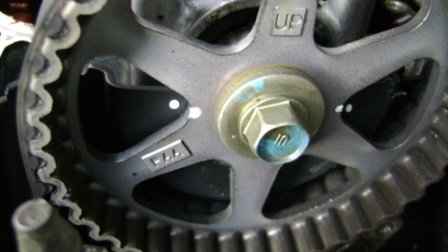
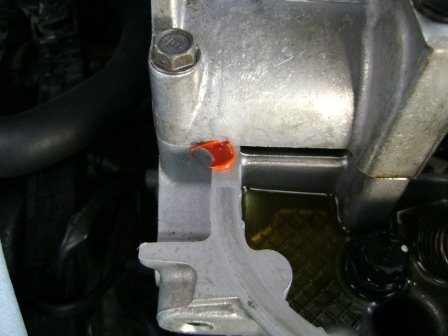
8. Align and Remove the Crankshaft Caster
Set the number-one cylinder to top dead center (TDC) and remove the crankshaft pulley.
You should rotate it counter-clockwise. If the spark plugs have been removed, you lot can grab the crank caster with both easily and rotate information technology. Another method is to re-insert the crank pulley bolt back into the crankshaft and rotate information technology clockwise until you have alignment. Then, with a quick snap of the socket wrench, loosen the bolt back off. Align the rightmost notch on the caster with the V-shaped alignment indicator on your timing belt cover. Yous can use a toothpick dipped into white pigment to mark the notch on the pulley.
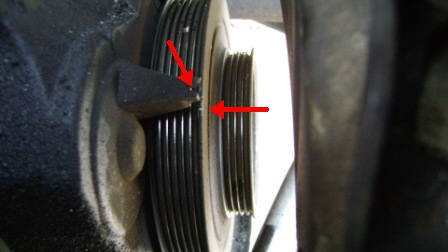
Crankshaft pulley aligned at TDC
9. Remove the Lower Timing Belt Cover
Piece of work around the perimeter of the lower encompass, then remove each of the retaining bolts. In improver, detach the wire housing recessed into the correct-hand groove of the belt cover.
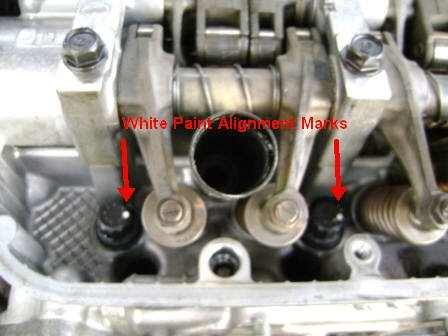
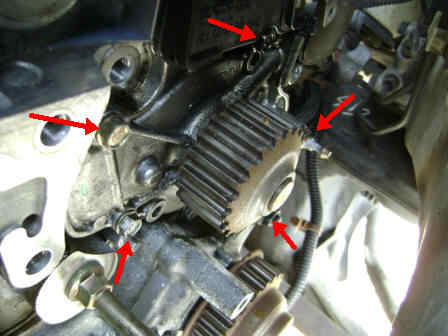
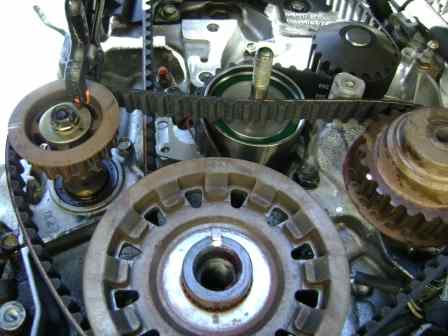
ten. Paint Alignment Marks on All Pulleys
Utilise paint marks on your camshaft pulley, crankshaft, and balance shaft pulleys for re-assembly alignment. If the camshaft is off by one cog when y'all put things back together, that will completely spiral upwards a timing belt replacement. The camshaft caster sprocket will have a stamp indicating "up." Utilize white pigment dots to the other pulleys and line them up with the engine block.
Camshaft marks
Crankshaft marks

Counter-rotating residual shaft marks
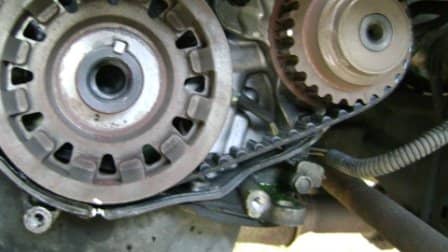
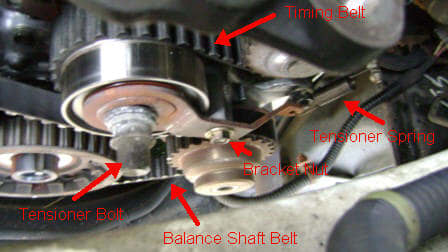
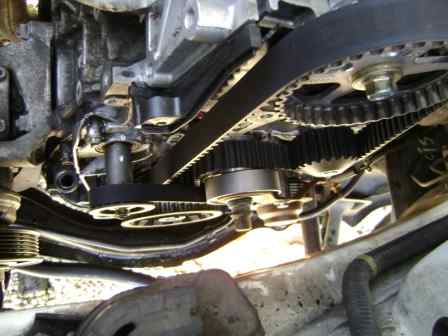
11. Remove the Timing Belt Tension Bearing Commodities, the Timing Belt, and the Residuum Shaft Belt
After the pulley tensioner bolt has been removed, remove the bound from the timing chugalug tensioner bearing and balance shaft tensioner bracket/arm. I removed the side engine mount for easier viewing.
The timing belt tensioner begetting and the balance shaft tensioner bearing are connected together on one support shaft. The balance shaft tensioner bearing is covered by the tensioner bracket.
Timing belt, counter-rotation balance shaft belt, and tensioner pulleys removed
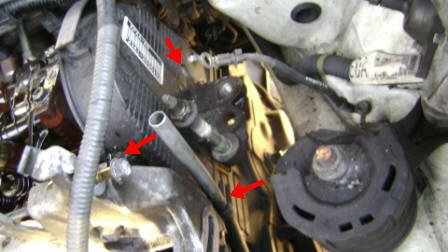
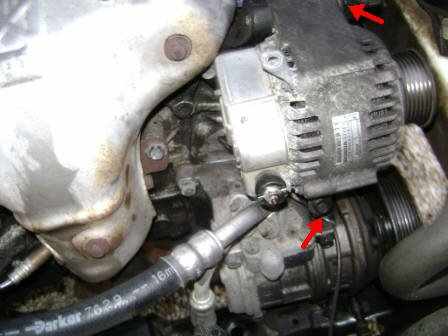
12. Remove the Power Steering Unit of measurement, Alternator, Alternator Bracket, and Power Steering Subclass
Next, remove the power steering unit, alternator, alternator bracket, and ability steering subclass—in that society.
The power steering subclass cannot be removed unless the alternator bracket is removed showtime, since the bolt holding the lower part of the ability-steering bracket is covered by the alternator bracket.
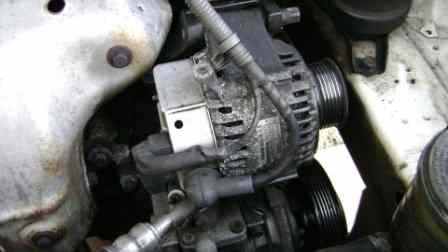
Removing the alternator.
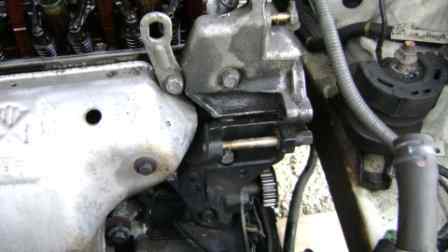
Remove the alternator bracket.

Removing the ability steering bracket.
thirteen. Remove the Frazzle Manifold
Now, yous'll need to remove the exhaust manifold.
Disconnect the O2 sensor leading out of the manifold. Then, remove the three bolts securing the oestrus shield onto the manifold. Detach the manifold from the cylinder head and exhaust downpipe.
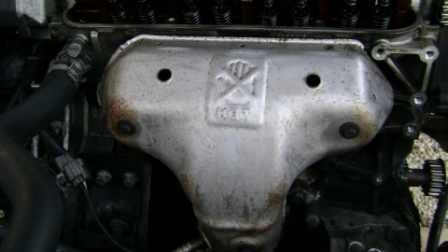
Removing the heat shield
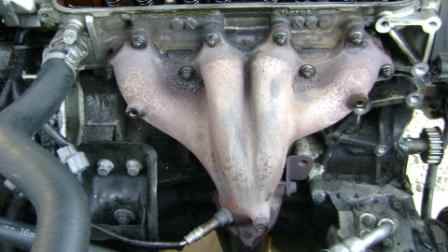
Removing the exhaust manifold
Exhaust manifold removed
fourteen. Remove the Distributor and All Other Connected Components
Remove the benefactor, the air filter box to the throttle body tube, the upper radiator hose, the upper heater cadre to the cylinder head hose, the throttle cables, the throttle body, the intake manifold plenum, the fuel connector, and various electrical fittings, and the vacuum hoses.
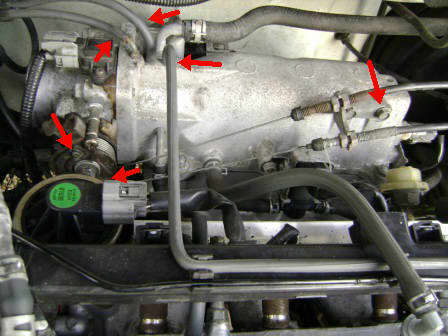
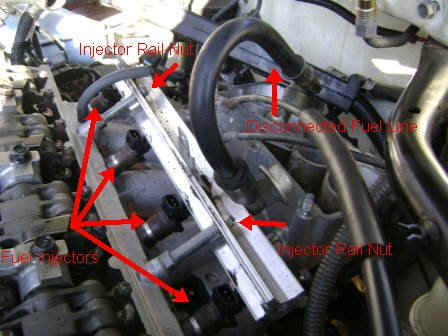
15. Remove the Fuel Injector Rail and Injectors
Next, remove the fuel injector rail and the injectors.
Two basics secure the rail to the injectors. After removing these nuts, begin wiggling and pulling on the rail. Do not pull on the rail at an bending—try to pull straight out. Either the injector(south) volition stay attached to the track or stay recessed in the cylinder head. Don't lose the injector O-rings.
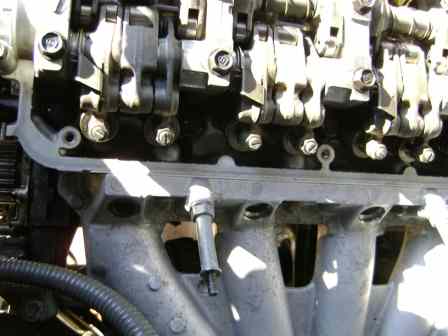
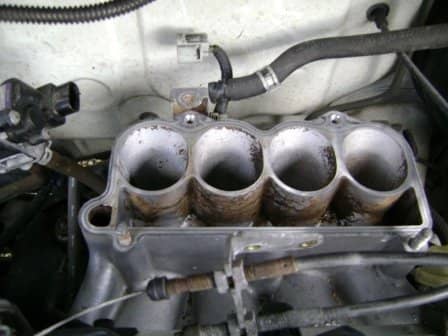
Intake manifold without injectors or rail.
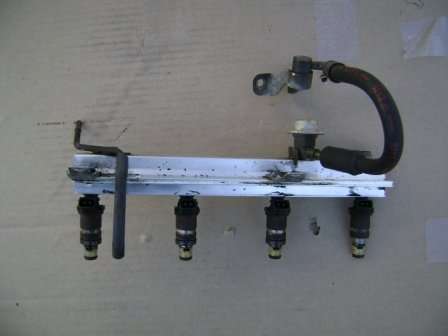
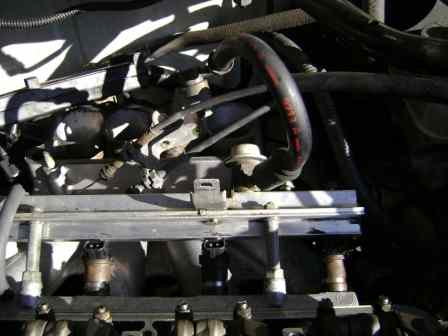
Injector rail with attached Injectors
xvi. Remove the Cylinder Head With the Camshaft and Intake Manifold Attached
Remove the bottom mounting bolts secured to the intake manifold. One bolt is for the manifold support bracket, and the other two are for the switch brackets. I chose to remove the oil filter to become a better view of what I had to deal with below the intake manifold.
Now, loosen and remove the cylinder head bolts and remove the cylinder head with the intake manifold fastened. Later on the caput is off the block, you can remove the camshaft pulley with an bear upon driver. In my example, it wasn't on as well tight and came off without a problem.
Loosen the head bolts in the sequence outlined in a repair manual. Do non loosen the bolts across ¼ plough during the initial release of tension on the bolt. Yous must use a 14mm spline socket.
I decided to remove the cylinder head with the intake manifold fastened. First off, working nether the car with limited lighting was a hassle. Too, the thought of getting below, and then in a higher place, then beneath the auto, and so forth during the intake nut tightening sequence seemed like a lot of hassle, specially when I could do it when the head was off the block.
So, using a stride stool, I climbed into the engine compartment and positioned myself so I could get both leverage and control. In that location are no photos of this step here since I did this entire repair with no aid.
Before attempting to remove the caput, move the plastic wire protector for the fuel injectors out of the manner. There are also various attachment points that demand to be disconnected. Once this is washed, you tin can motion the wire protector out of the manner so it won't be an obstacle when removing the head with the attached manifold.
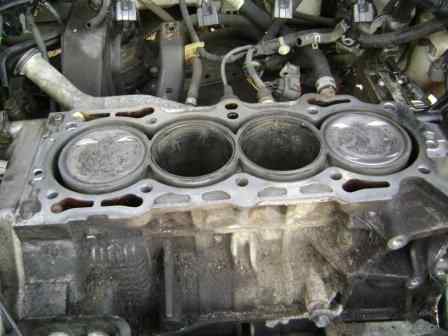
Afterward the removal of the cylinder head and some cleanup.
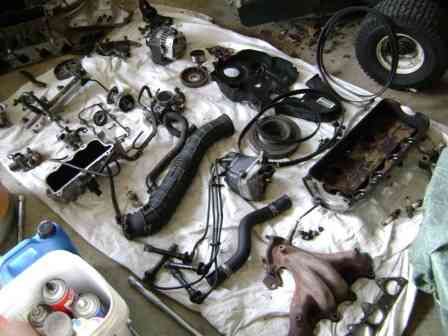
The inventory of removed parts.
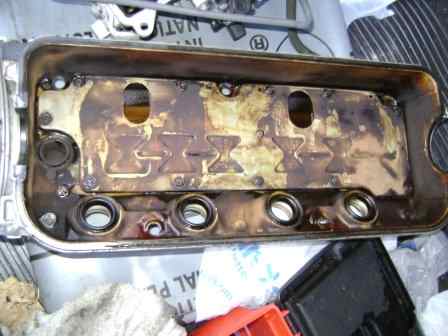
Valve cover earlier new spark plug gasket and valve cover gasket replacement.
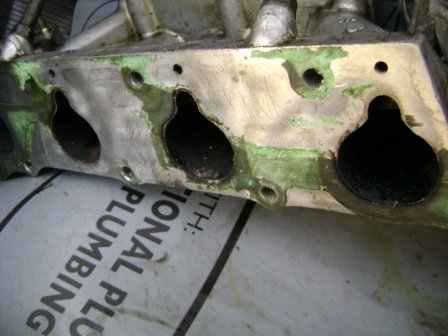
Fractional removal of old intake manifold gasket.
17. Send the Cylinder Head to an Car Shop
I sent the cylinder head to an automotive machine store for crack testing, valve status testing, and testing for warpage. The valve cover, intake manifold, and plenum were likewise steam- and pressure-cleaned. Fortunately, the caput was only slightly warped, which required only a .001 milling (shaving) to flatten the mating surface.
The price of all this shop work came out to less than $100.
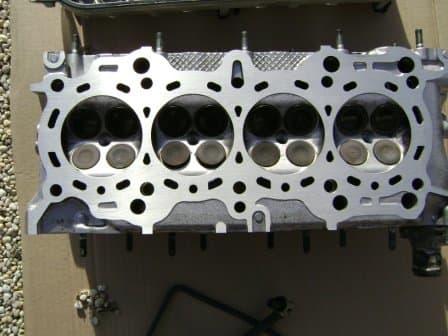
Photos of the Head After it Came From the Automotive Machine Store
18. Prepare for Re-Assembly
The block deck surface must be truthful (completely apartment) and gratis of whatsoever debris before mating the caput with the block. Do not utilize any tool (like sandpaper) that could scratch the block deck. Although the roughness boilerplate (RA) is supposed to exist around 30, which is almost a mirror finish, the automotive machinist told me that the electric current status of the deck (information technology was from the mill) should exist skillful enough. Just make sure that the surface is costless of oil and debris. I used a combination of 0000 steel wool and ultrafine polishing compound to make clean the block deck.
xix. Attach the Intake Manifold to the Cylinder Head
Attach the intake manifold with the new gasket to the cylinder caput. And so, torque each nut per the manufacturer's specifications.
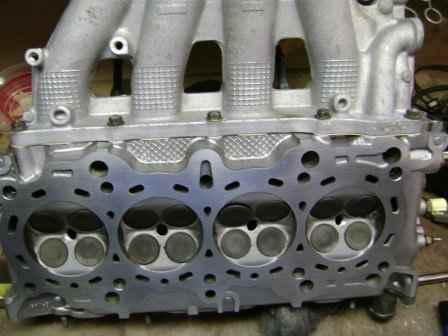
Cylinder head with intake manifold fastened.
20. Install the Cylinder Caput
Lubricate the TTY head bolt threads with 30-weight oil, including the head with the washer.
Remove any oil from both the cylinder head and the engine block deck with acetone or any other non-oil-containing oil solvent. Chase the commodities hole threads for any obstruction. Then, blow out whatever debris in the bolt holes with compressed air.
At present place the new head gasket on the cake. The gasket I used was FelPro'due south PermaSel MLS.
Ensure that the camshaft position is set to cylinder one top dead center. The groove in the camshaft for mounting the camshaft sprocket should be pointing up, and both the intake and exhaust rocker arms should be loose.
To ease alignment of the cylinder head TTY bolt holes with the gasket and engine block holes, identify two oil-free bolts on the back left and right bolt pigsty-corners of the cylinder head. Bending the head on the block, aligning the two bolts that are protruding from the head with the holes in the engine block. After the head is mounted, jiggle and twist the TTY bolts to ensure that they cleared the head gasket. Do this for each of the x bolt holes. (The bolt pigsty in the back center of the head uses the extra long commodities.)
After alignment, remove the old bolts and twist in the new bolts, mitt-tightening each bolt with a 14-mm spline socket attached to a ½" extension. You may accept to tilt the cylinder caput and hold it forward to offset the weight of the intake manifold.
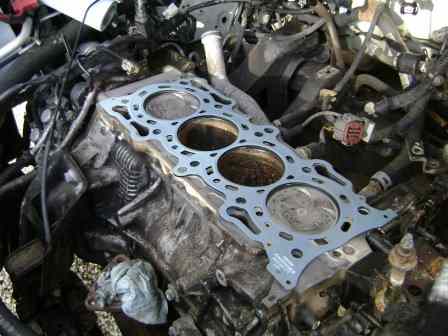
New Head Gasket with Cylinder Head ready of installation.
21. Torque the TTY Cylinder Head Bolts
Torque down each head bolt to 22 lbs, using a torque wrench with the manufacturer'due south outlined torque sequence. Make sure you place white paint dots on each of the bolt heads before angle torquing each commodities at 90 degrees or 1/4 turn. Repeat this task three times for each head commodities for a total of 270 degrees or ¾ turn.
22. Re-Adhere the Fuel Injectors
It may exist easier to remove each injector from the fuel rails and insert them back into the intake manifold ane at a time. Utilize a small amount of silicone spray to the injector O-ring to ease the process. Then, printing the injector rail against all of the injectors. Two track retaining nuts can now exist screwed on and one safety tube attached to the intake manifold.
23. Re-Adhere Cooling Arrangement Components
Re-attach the thermostat housing components, the oil pressure sensing unit of measurement, and the EGR valve.
Supplant whatever cooling system-related O-rings, if they announced worn, or apply silicone gasket making fabric on the outer edges to obtain a skilful seal.
24. Re-Attach the Intake Manifold Plenum
Mount the intake manifold plenum onto the intake manifold and connect all fittings. Upon completion, adhere the throttle torso and connect all fittings.
25. Attach the Exhaust Manifold
Install the exhaust manifold with new gaskets. Then, attach the heat shield and torque co-ordinate to specifications. When y'all are done, adhere the electrical connection for the O2 sensor.
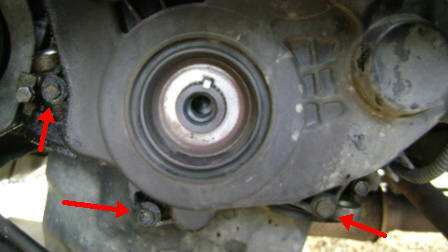
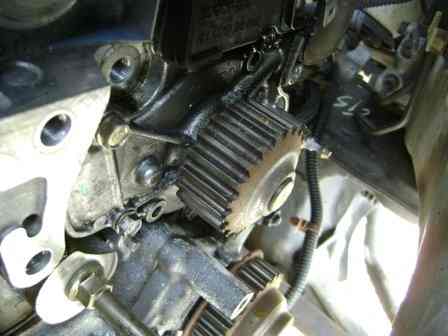
26. Replace the H2o Pump
Most new pumps come with a new O-band. Clean the mounting surfaces and commodities on the new pump, finger-tight. Alternate the torque on the bolts during installation.
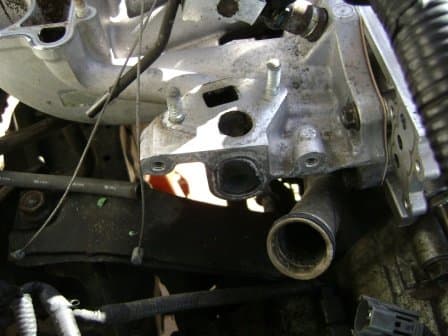
H2o pump location

New water pump compared to old
27. Install New Timing Chugalug Components
Ensure that the camshaft and crankshaft pigment marks are aligned.
- Install the new idler pulleys. Position the timing belt idler pulley to allow the nearly slack on the belt during installation.
- Install the new timing belt starting from the crankshaft counterclockwise.
- Move the camshaft sprocket 1 cog if yous're having difficulty slipping on the new belt. Reposition the sprocket afterwards the chugalug has been installed. Relieve tension from the caster bolt to permit the belt tension spring to remove belt slack.
- After installing the timing belt, temporarily remove the residue shaft pulley to ease the installation of the balance shaft chugalug. Use the alligator clip to hold the leftmost role of the belt in place; and so with both hands, employ tension to the bottom portion of the chugalug by turning both shafts inwards. The white marks should exist in alignment. If non, then accelerate to retard the belt position until they are. At that indicate, y'all tin can mount the tensioner bearing with the bracket and nut.
- Attach the balance shaft jump to the residuum shaft arm and the spring mount protruding from the h2o pump. Button downward slightly on the rest shaft bearing and allow the spring tension let the proper tension to exist applied to the bearing. Tighten the timing chugalug nut.
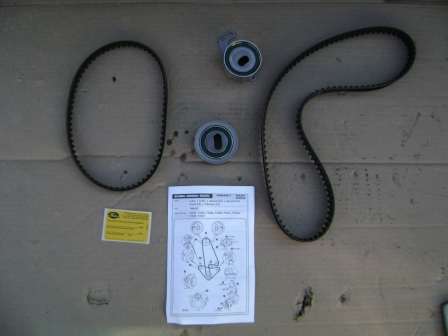
Timing belt component kit with new timing chugalug, balance shaft belt, and 2 idler pulleys.
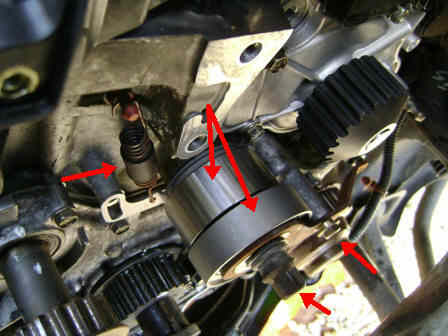
Installing the new timing belt idler pulley, tensioner spring, balance shaft pulley, pulley bracket, and bracket commodities.
New timing belt installed and balance shaft pulley temporarily removed.
Rest shaft caster installed.
28. Attach the Lower and Upper Timing Belt Covers and the Valve Encompass
Subsequently the timing chugalug covers have been fastened, slide the crankshaft pulley onto the crankshaft. Torque downward the crankshaft pulley commodities per the manufacturer's specifications, or apply an impact driver.
Employ a little gasket seal silicone on each corner where the valve cover meets the camshaft hump. This will provide a adept oil seal.
Timing belt covers attached
Silicone gasket seal
29. Mount the Distributor Back Onto the Cylinder Head Camshaft
The mounting of the distributor onto the camshaft may be fabricated easier by offset removing the distributor cap from the distributor. You have to button downward the heater hose while wiggling the rotor to obtain alignment with the camshaft groove. Earlier installation, make certain the rotor is pointing to the number 1 cylinder contact bespeak in the distributor cap.
After installing the benefactor, reconnect the distributor cap, thread the spark plugs back into the cylinder head, and connect the ignition wires. Now, identify a little dielectric grease inside the spark plug boots to forestall the boots from fusing with the spark plug.
Re-assembled valve comprehend, distributor, and ignition wires.
Re-attached alternator and power steering mounts, with motor oil dipstick.
30. Re-Attach the Alternator and the Power Steering Pump
After installation, adhere either new or existing belts and tension them according to the specifications.
Re-attached alternator.

Alternator with new chugalug.
Re-attached ability steering pump with new belt.
31. Attach the Side Engine Mount

Re-attaching the side engine mountain.
Task Completion Checklist
You are now done. Here'southward your final checklist:
- Is the battery connected?
- Does the engine oil need to exist replaced?
- Is the engine oil level okay?
- Is the power steering oil level okay?
- Are all tubes and wires snug and secure?
- Is the coolant level okay?
- Is the wheel mounted back on the car?
- Are the jack stands removed?
- Is there any obstruction under the car?
Now, start your machine. Let it run for less than a minute, then turn it off. Check fluids.
Restart your auto. Check the coolant level over again.
Restart your machine one terminal time and allow it warm upwards. Go on a close centre on the coolant temperature. Keep re-checking fluid levels.
Completed head gasket repair task
Only Need a Timing Chugalug Replacement?
- Accord & Acura CL Timing Chugalug & Water Pump Replacement
Only Demand a Radiator Replacement?
- Accordance & Acura CL Radiator Replacement
This article is accurate and true to the all-time of the author'southward knowledge. Content is for informational or entertainment purposes only and does non substitute for personal counsel or professional advice in business, fiscal, legal, or technical matters.
Questions & Answers
Question: I don't come across any oil libation line's on the original radiator. I bought one and information technology has 2 brass fitting for the lines. what practice I need to do?
Answer: If no oil cooler lines in the original radiator, and so continue the plastic caps on the contumely fitting of the new radiation and ignore it.
Source: https://axleaddict.com/auto-repair/F23HGRepair
0 Response to "What Do You Beef to Have to Replace the Head Gasket on a Accord 02"
Postar um comentário